
Day 1 - Build Your First Autonomous AI Agent with n8n (No-Code Demo)
Week 1 · Day 1 · Lecture 1. Before any code, before any setup, you build a working autonomous agent by dragging four boxes onto a canvas. The point is not the tool — it is to see, in about five minutes, exactly what an agent is.
The one idea to take away
An AI agent is an LLM called in a loop, with tools, to achieve a goal.
That single sentence is the spine of the whole six-week track. Everything that follows — the OpenAI Agents SDK, CrewAI, LangGraph, MCP — is a different way of expressing that same loop. Agentic AI is about gluing together repeated calls to an LLM so that together they accomplish something one prompt could not.
Why start with a no-code tool
This course builds agents in code. n8n is a drag-and-drop workflow builder, and it appears here for one reason: it makes the moving parts visible. You can see the trigger, the agent, the model and the tools as separate boxes with wires between them. Once you have seen the shape, the code in the rest of the course stops looking mysterious.
Following along is completely optional. n8n offers a free 14-day trial, no payment required. If you would rather just watch and get the gist, nothing later in the course depends on it.
Practical steps
1. Create an n8n account
Go to n8n.io and click Get started for free. The form asks for a company email but a personal address works fine. You get a verification link, then set a password and an account name, then start the free 14-day trial and answer a few onboarding questions.

2. Open a blank workflow
After onboarding, choose Start from scratch. You land on an empty canvas — this is where the agent gets built.

Tip: n8n opens a configuration panel every time you add a node. Press Esc to close it and get back to the canvas. You will press Esc a lot.
3. Add the trigger
Click Add first step, type chat, and choose On new chat message. This is how the workflow starts: a user sends a message. Press Esc.
4. Add the AI Agent
Click the + to the right of the trigger and add an AI Agent node. Press Esc. Your first agent is on the board.
Notice the three sockets underneath it. The agent wants to be told three things:
- Model — the LLM that does the thinking. Required.
- Memory — what it remembers between turns.
- Tool — what it can actually do beyond producing text.
Those three sockets are the anatomy of every agent you will build in this course, framework or no framework.
5. Give it a model
Attach a chat model to the Model socket. You have options:
- OpenAI — most people already have a key.
- Google Gemini — free and cheap tiers.
- OpenRouter — one key, many models, an easy route to free or cheap options. This is what the screenshots below use.

Choose Create new credential and paste your API key; n8n validates it for you. On OpenRouter the key comes from Settings → API Keys → Create API Key.
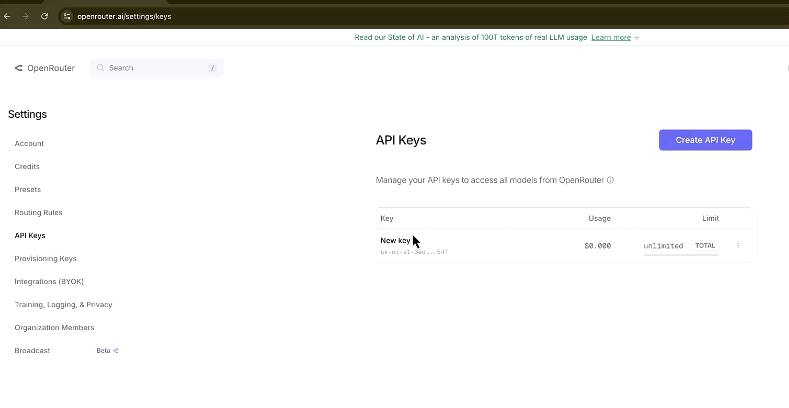
Then pick a specific model from the dropdown — a small, cheap one is perfect for this demo.
No key yet? Don't worry. Week 1 Day 1 sets up keys and .env files properly a few lectures from now. Watch this part and come back if you want to build it.
6. Look at what you built
The finished workflow: a chat message arrives, it flows into the AI Agent, and the agent is backed by a chat model. Add a tool to the third socket and the agent can reach out into the world.

What you should now understand
- An agent is a loop, not a model. The model is one component inside it.
- Every agent needs a model; memory and tools are what make it useful.
- Tools are where autonomy comes from — without them an agent can only talk.
- A drag-and-drop canvas and 200 lines of Python express the same structure. The rest of this course builds that structure by hand, so you control every part of it.
A word on cost
This course makes real API calls, which means a small spend. Cheaper alternatives (DeepSeek, Gemini free tiers, OpenRouter) and free local models via Ollama are covered on Day 3. Keep an eye on your provider's usage dashboard.
Resource links
- n8n.io — sign up for the free 14-day trial
- n8n AI & agent documentation
- OpenRouter — one key, many free and cheap models (used in the screenshots)
- OpenRouter → Settings → API Keys
- OpenAI API keys · Google AI Studio (Gemini free tier)
- Course resources page — links and supplementary videos
Next
Lecture 1.2 — Course Roadmap: 6 Weeks, 8 Projects in Agentic AI Engineering — lays out where the track goes from here.